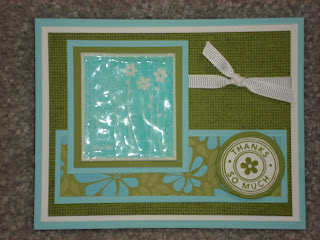
This month for our Stamper's club, I showed the ladies the Cracked Glass technique, and also how to use a wheel. I have to admit, since I've been so busy lately (wedding invites, vacation, moving), I shamelessly CASED both of our projects! Who am I kidding? I love to CASE! Most of the time though, I change at least a few things about the card if not most of it. These two cards however, are just about Exactly the same as the ones I CASED. Thanks ladies for the ideas and inspiration! :)
 The first card we did is from Terri over at http://www.stampinterri.typepad.com/. Check out her blog - she has awesome ideas! She's also my up-upline! When I saw this card, I just knew it was the perfect one for me to demonstrate at my next club. I wanted to do the Cracked Glass technique, and also wanted to use some of our designer papers, as well as use up my Cool Caribbean cardstock. This card allowed me to do all 3! I think the only thing that is different from Terri's card is that I used Old Olive cardstock instead of True Thyme. See Terri's card here. This technique is very cool; and I don't mean that just because you need to put it in the freezer! ;) (SO corny; I know!) The ladies had a great time making this one. The supplies you need are: Glassy Glaze Ultrathick Embossing Enamel (UTEE), a heat gun, and Versamark. Stamp your image on cardstock, and apply Versamark over your image. Sprinkle UTEE liberally over the entire image, then heat. The directions say to apply 3 times, but check it after 2 times; if it's nice and thick, don't worry about doing it again. The UTEE is used up fast, so if you have a larger group, think about buying 2 jars, and use 2 layers instead of 3 (just make sure you instruct them to make the layers thick). Then just put your piece in the freezer for about 10 minutes and then bend the paper, "snapping" it, and creating the cracked look. Here is a closeup of the Cracked Glass:
Hopefully you can see the lines across the image; click on the picture for a larger view. To make the lines stand out more, apply the same colored ink (I used Cool Caribbean ink) over the glaze, then wipe off. The ink will seep into the cracks, making them a bit darker. You can also use a different color of ink, like a light brown, and it will make your image look more "vintage".
 The second card we did, I found on Splitcoast, from Kris (parkerquilter). Click here for her card. I loved how she watercolored the jellyfish and used Crystal Effects on his head, so I had to do that too! :) This card was a great opportunity to showcase the Wheel Guide, and also the grid paper. Not many of my members use wheels very often, so I wanted to show them how to do it properly, and make them more comfortable with the technique. I'm just so sad they retired Fishy Friends, so I had to use it one last time!
1 comments:
You have a wonderful blog! Thanks for coming by mine and commenting, so I could see yours also! Vicki
Post a Comment